Learn how to build a custom wood DIY screen door from scratch! Features pet screen and how to build with a Kreg Jig pocket hole maker.
Adding ‘professional builder’ to my long list of to-dos was really never in my sights.
For the past 10 years, I’ve gotten by with my somewhat primitive (rustic) building techniques teaming up reclaimed wood and screws to create all my DIY projects. Easy! Done! Imperfectly perfect!
But then there comes a time when you want to make something that forces your hand in a slightly new direction.
Not loving what the stores carried for screen doors, I’ve wanted to build my own version of a wood DIY screen door for over 10 years.
Past screen projects
This wasn’t my first screen door project. I’ve attempted a screen door for french doors before but it wasn’t built from scratch… but it was an easy fix!
Wood framed screen for tricky windows
View all my screen projects HERE
Why build a custom screen door yourself?
- get it to fit your exact door measurements
- design it to compliment your front door rather than work against it
- get the style and finish you desire
- for added fresh air ventilation
- keep pets / dogs / cats safely inside
However this round, this door would be built from scratch because I wanted to design the DIY screen door around my front door to compliment each other.
But I needed to come up with a way to join the wood without mickey-mousing a thousand brackets together and such!
That’s when I decided to bite the bullet and buy a new tool to do this DIY project for my front porch right!
Not only did my dream DIY screen door become a reality, I also found I used my new pocket hole jig for nearly every project right after! Two of the best decisions ever.
So if you too can’t land the screen door of your dreams and would like to build your own diy screen door from scratch too, here’s the tutorial instructions for mine!
This post contains Amazon affiliate links in which I earn a small percentage if you purchase something through them, with no added cost to you. Thank-you for helping support this blog! Read the rest of my disclosure page HERE
Meet Kreg! This is a Kreg Jig to be exact. And this helpful woodworking tool helped me build a wood screen door from scratch, with very professional results! Especially for a beginner.
I bought it without knowing how to use it, vowing to figure it out once I got home. And it ended up being the best tool decision I’ve made in a good long time. I use it ALL the time since getting it! So don’t hesitate. Get one.
What is a Kreg Jig?
A Kreg Jig is a specialty tool that creates pocket holes in wood, making it effortless to join wood at right angles, such as picture frames.
Video – how to use a Kreg Jig
.
[adthrive-in-post-video-player video-id=”3TqDDfan” upload-date=”2020-05-27T19:15:25.000Z” name=”How to use a Kreg Jig” description=”Learn how to use a Kreg Jig, a handy tool that creates pocket holes, making wood joints easy!” player-type=”default” override-embed=”default”]
.
Visit above to watch a short video on how to use a Kreg Jig!
Learn How to use a Kreg Jig from THIS full tutorial.
View many projects I’ve made with a Kreg Jig HERE
Find current Kreg Jigs on Amazon HERE
View Kreg Jigs at Home Depot HERE
So now that you too are an ‘expert’ on this new building tool mastery, let’s build a rustic DIY wood screen door using it!
How to build a wood DIY screen door from scratch
Supplies I used:
Standard lumber planks:
1×2 / 1×3 / 1×4 / cedar strips
You will be cutting to fit your door opening, however here are my measurements anyway:
Overall DIY screen door dimensions: 36″ wide x 75″ tall.
Top: 1×3 – 36″ long
Bottom: 1×4 – 36″ long
Sides: 1×3 – 75″ long (x2)
Middle: 1×3 – 32″ long
Middle: 1×2 – 32″ long
Lower verticals:
1×3 – 29″ long
1×2 – 29″ long (x2)
Cedar strips – to fit around entire door frame (see below for more on this)
Tools:
Supplies:
Fusion Mineral Paint’s Stain & Finishing Oil in a mix of Cappuccino and Golden Pine
(find a local Fusion merchant from HERE)
Short black screws (I like using Phillips Truss Head Screws)
Paint brush and rags for staining
Higher grit sandpaper for finishing
Hardware:
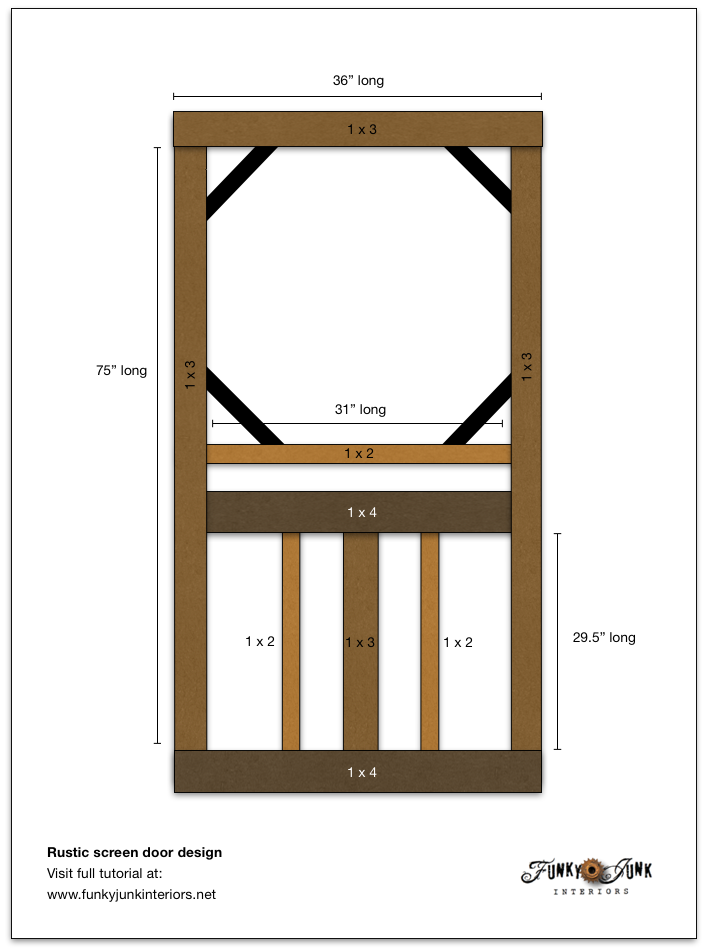
Screen door plans
The above diagram was sketched out to determine how I wanted my new screen door to look.
I used standard lumber measurements to design this simple screen door.
Building the DIY screen door frame
.
1. Measure the open doorway where you desire your screen door to be, then cut lumber to create a simple frame that fits inside, with a little room to spare.
Be sure to leave room to clear a doormat.
Screen door dimensions:
Overall DIY screen door dimensions: 36″ wide x 75″ tall.
Lumber measurements:
I suggest to purchase high quality lumber (without a bunch of joins) for the best durability.
Top: 1×3 – 36″ long
Bottom: 1×4 – 36″ long
Sides: 1×3 – 75″ long (x2)
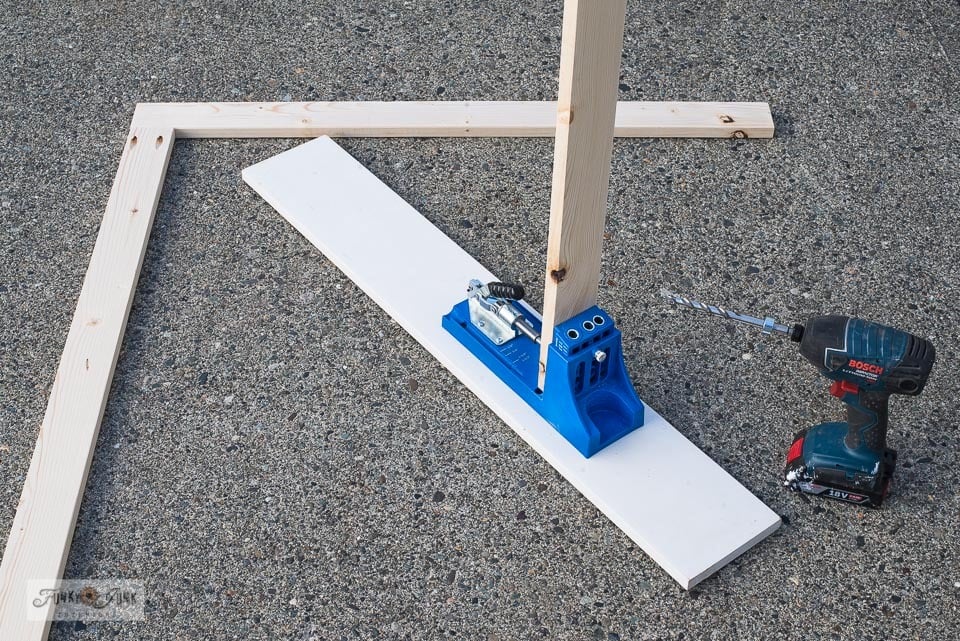
2. Use the Kreg jig to join the 4 corners.
I added pocket holes to the tops and bottoms of the side boards.
How to place pocket holes for strong wood joins
There’s a bit of a trick to deciding which pieces of wood to add pocket holes to.
For the strongest holds, run screws into the sides of wood grain vs. straight into wood grain.
Think of wood grain as loose straws. There’s more strength if you drill into the sides of them vs. straight onto them. So this will help you determine where to add the pocket holes for all your lumber joins.
HERE is the video on YouTube where I learned that valuable tip.
3. Attach the four corners of the frame together using pocket screws.
Assembling tips:
- This wood was very brittle, so I found pre-drilling holes first helpful to avoid splitting the wood.
- Practice on scrap wood first until you get the hang of it.
- Ensure you are choosing quality lumber. I found it split much less.
- I also changed out to drywall screws which I personally found split the wood less.
- Personally, I did not use wood plugs to fill in the pocket holes, but you certainly can.
How to style a wood DIY screen door
4. Once your frame is built, start styling inside the door frame with additional lumber for support and design, then attach them with the jig.
I loosely fit the basic frame against the outside of my exterior door I could decide where I wanted to add details to complement the existing door.
Note how the screen door supports don’t interfere with the original door window? You get to choose when you design your own custom DIY screen door!
Attaching the DIY screen door to the house
I couldn’t wait to pretty up my newly painted black-ish brown front door even more!
5. Prepare your door frame to mount the screen door hinges.
I ended up adding one strip of 1 x 2 to the left side of the door opening, and painted it out like the rest of the door frame. This appeared to work best over all other options tried.
The top of this additional board was cut at an angle, with the bottom, a flat cut.
Get Fusion Mineral Paint’s Stain and Finishing Oil for 10% off HERE
Staining the screen door
6. Stain or paint your screen door depending how you want it to look.
- appy with a brush
- two coats works best
- sand in between coats
Fabulous stain products I used:
Because I desired rustic wood accents on the outside of my own home and to bounce off that gorgeous black-brown door, I chose a custom stain mix made from Fusion Mineral Paint’s Stain and Finishing Oil.
I mixed mostly Cappuccino with a little bit of Golden Pine.
Two coats of stain worked best, helped to deepen the tone and gave the wood a slightly satin finish. Beautiful!
High grit sandpaper was used in between staining to achieve the smoothest finish possible.
Note: this stain is not rated for outdoor use due to not having UV protection. Fusion SFO is the only stain I like to use due to it not smelling as toxic as most, so I took a chance because my door is well protected. 2 years later, the door has not faded at all! It’s beautiful.
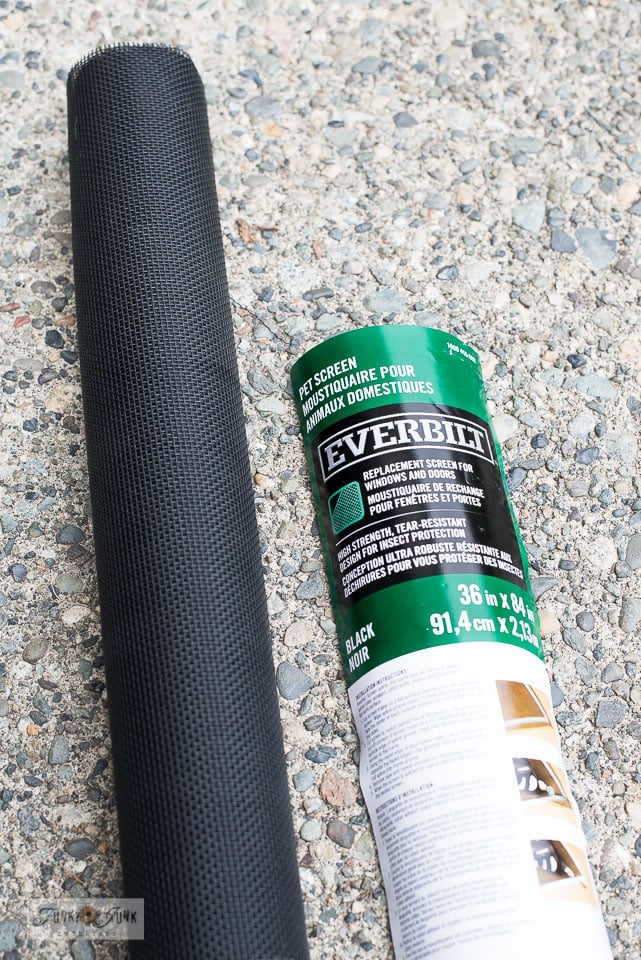
Attaching pet window screen
I started with standard window screen, but within two days, my cats climbed the screen door, creating pulls in the screen mesh! Before I even took pictures! Bah!
So that’s when I decided to bite the bullet and try pet window screen instead.
Standard screen (left) vs. Pet screen (right)
Window screen comparisons
Pet window screen is SO much stronger. It’s infused with some kind of nylon for added strength.
The price was dramatically higher too. The standard window screen cost $15 while the pet window screen was $60. Ouch.
But I was curious about trying it anyway as the cats climb up ALL my screens, so I’ll report back once I (we) have some experience with it.
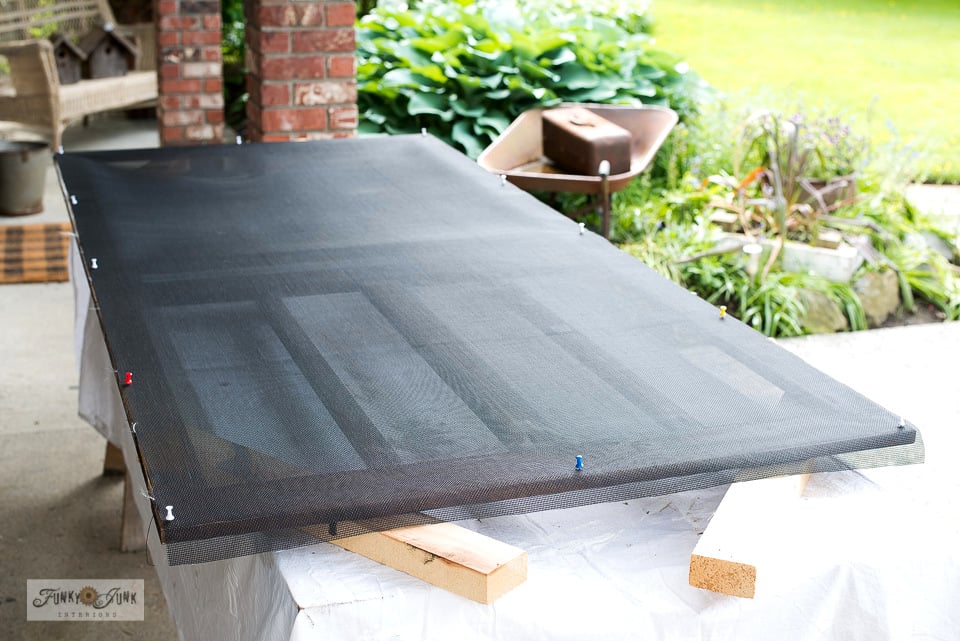
Attach window screen with staples
7. Unroll the screen on the back of the screen door, and use push pins to hold the screen in place while gently pulling the screen taut.
8. Use an automatic staple gun to attach the screen to the door frame.
I stapled along one side, then the opposite, then finally the two ends. It worked wonderful!
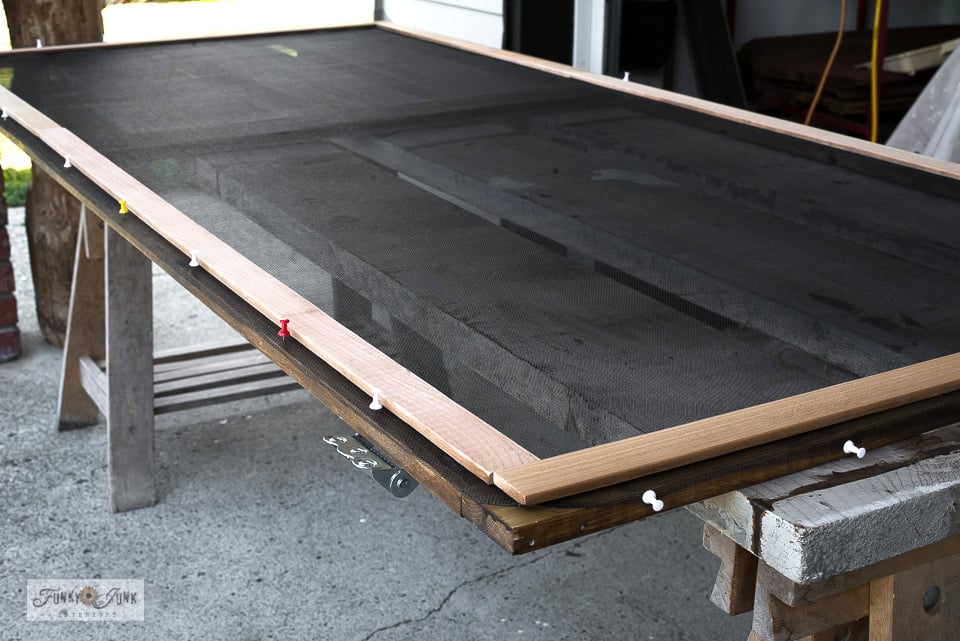
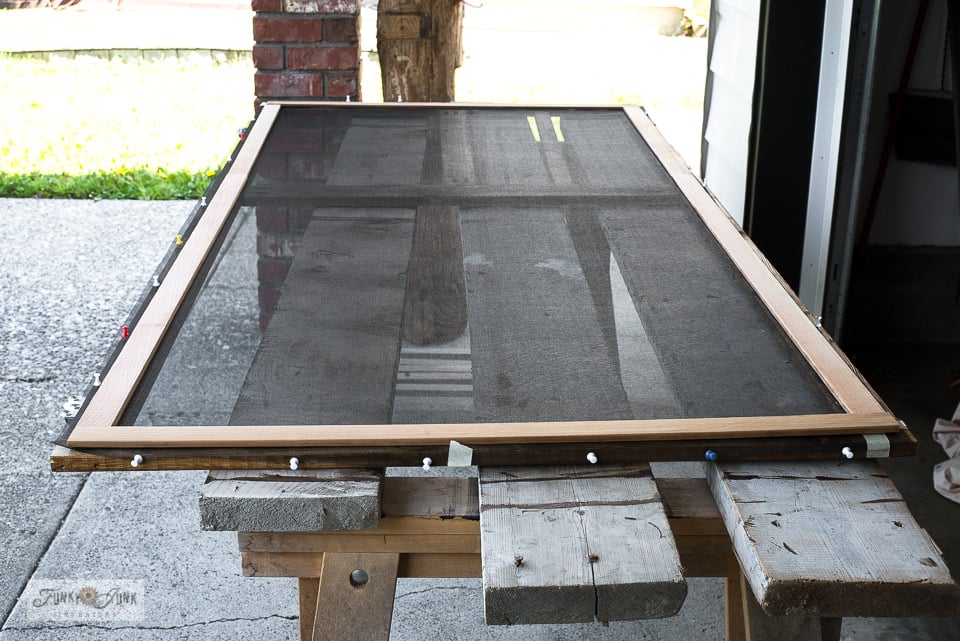
Adding cedar trim to hide staples
9. Dry-fit and cut cedar wood strips as trim pieces to frame the edge of the screen, then stain or paint as desired.
Because this was my front door and I’d see the inside all the time, I decided to cover up the screen edges and staples with cedar wood strips. They were cut to size, then stained.
Adding corner supports inside of the door
10. Attach the cedar strips by pre-drilling holes, then using short screws (I use THESE) to hold in place.
11. Add some painted cedar strips to some corners to help keep the door square. It looks cool too!
I cut 4 additional cedar strips, painted them in black-brown, then created a triangle template out of paper to help guild even placement.
Tip: I suggest to add the corner supports AFTER the door is hung. If the door sags a little, you can then hold it into the position desired, then attach the corner supports to keep it that way. It really helps!
12. Trim excess screen with a utility knife, or leave extra in case you desire to re-tighten the screen in the future.
I left extra just in case, as shown above.
Attaching hardware
13. Select 2 spring hinges, a door handle and a hook and eye lock. Or pick up a full screen door kit for added convenience.
If you can find adjusting spring hinges, I think they are a better choice so you can tighten them up as time goes on. I used standard non-adjusting on this door so I’ll report back how they do.
Visit how to install self adjusting hinges HERE on another screen door post I did.
14. Paint if desired.
I spray painted the door hinges and door pull in a gloss black to match the door’s aesthetic.
How to install the screen door
15. Attach screen door to the house.
- Position door frame inside opening.
- Place blocks of wood under the bottom of the door to lift the door into position, ensuring it clears carpets, etc.
- Attach hinges to house frame (6″ from top, 9″ from bottom) and onto the door.
- Remove blocks of wood.
- Check movement, ensuring the door clears the frame. Trim with a chisel if needed.
- If the door sags, hold the door into the desired position, then mount the corner brackets while pushing the door into the desired position, then attach. It helps!
- Add cabinet bumpers if desired so door closure sound becomes muffled.
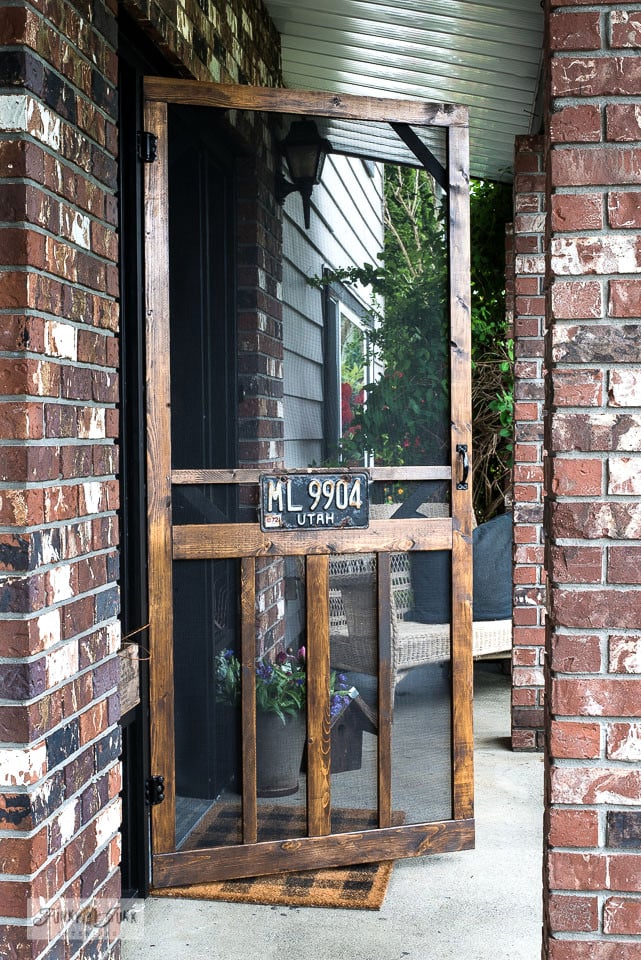
And are you even ready for the full tour of my brand spankin’ new DIY rustic screen door from scratch?!
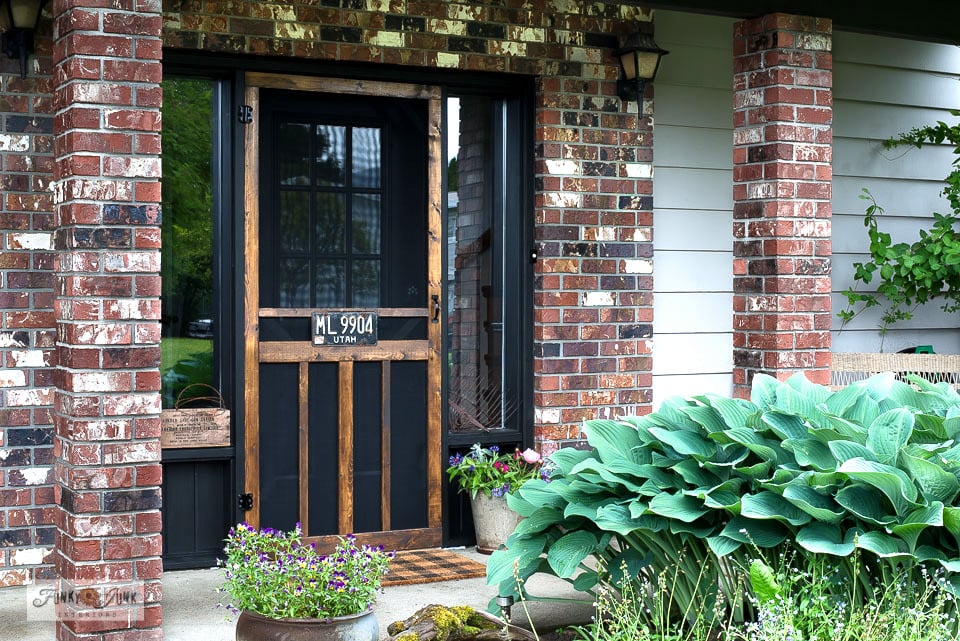
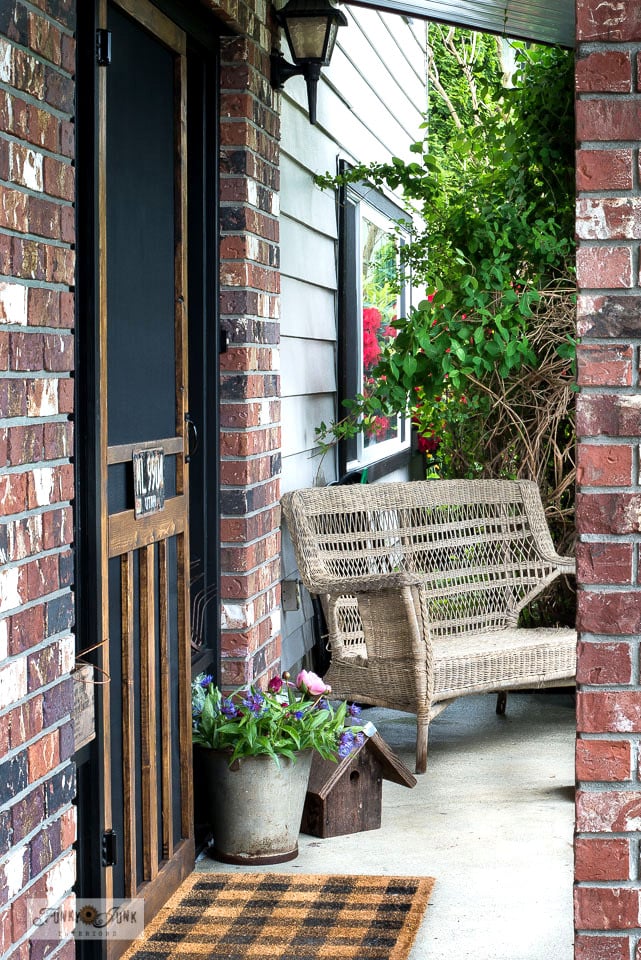
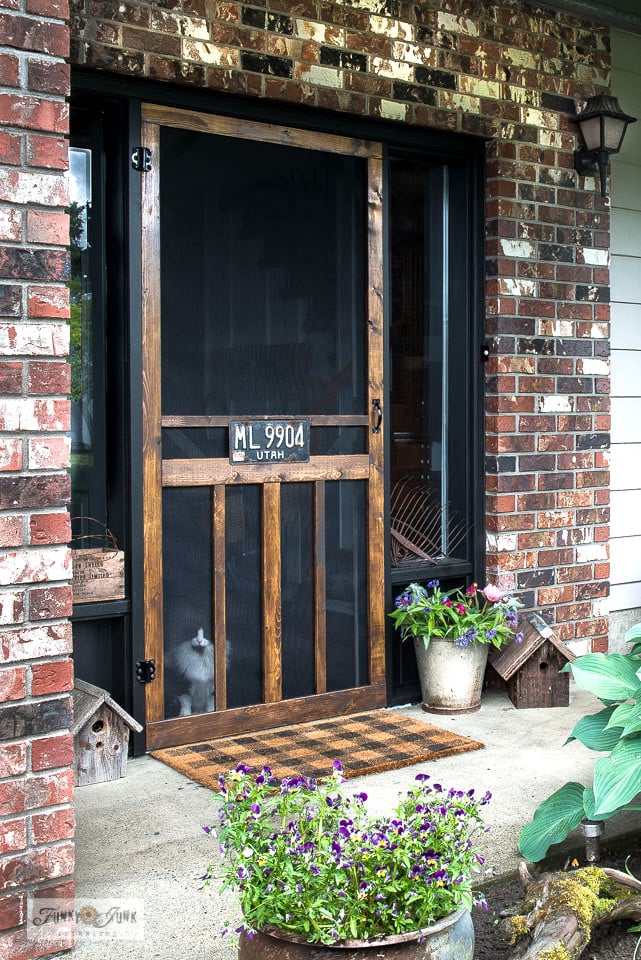
The finished wood DIY screen door!
I mean… look at it! Isn’t this wood grain screen door gorgeous? Love how rustic yet upscale it looks! And it compliments the front door perfectly!
Because I desired to add the black license plate, I added one more wood piece to help brace it in place.
Don’t you think the additional junk factor is cool?
I had planned to create a soda pop stencil to add a faux enamel advertising sign however my ideas weren’t working out, so I’ll save that idea for another project!
The door and sidelights were painted a deep blackish-brown so it would allow the wood screen door to do all the talking.
Visit how I painted my front door blackish-brown HERE
I just love the old charm coziness this wooden rustic screen door adds!
Teamed up with the Buffalo Checked front door mat HERE, it’s perfection.
Find the Buffalo Check stencil HERE
The little wicker bench faces the front yard and is the perfect little spot for a quick chat at the front door or to enjoy an evening coffee.
Oops! Forgot the pillows!
Learn how I made the Wild Flower Seeds pillow HERE
Find the Wild Flower Seeds stencil HERE
And here is how the wood screen door looks with the front door open.
Perks of a front screen door
- added air ventilation
- compliments a front door
- allows pets to view out while safely inside
Why, hello Sky! How nice of you to step into the picture. Perfect timing! Both cats adore the screen door and sit in front of it all. the. time. They love the cool breeze as much as I do! But sorry, no bugs will be coming in to play anytime soon!
And I’m happy to report, the cats have attempted to climb the screen door once, but didn’t like the pet screen. No damage was done and they leave it alone. So, pet screen works and was worth the added cost.
Another super awesome perk is the added airflow through the house. The cooler air sweeps right upstairs now, so it’s already been amazing, and we haven’t even hit the middle of summer yet. Great timing!
Summary
.
I’ve wanted a wood screen door on this house for over 10 years. But I didn’t like the price nor the looks of the ready-made ones.
However making one was the best decision I’ve ever made. Not only did it allow me to get the look I desired, it also added to my building skills!
I just about feel like a real builder now! Ok, maybe after the 4 more I wish to make…
See what can happen when you learn something new?!
Think you’ll try to build a rustic screen door? How would you want yours to look like?
How to build a wood DIY screen door from scratch
Learn how to build a custom wood DIY screen door from scratch! Features pet screen and how to build with a Kreg Jig pocket hole maker.
- Kreg Jig
- Staple gun
- cordless drill (I love Makita!)
- Bosch variable speed orbital sander
- Miter saw
Lumber list – you would cut-to-fit but my door is 36" wide x 75" tall
- 1 top 1×3 – 36" long
- 1 bottom 1×4 – 36" long
- 2 sides 1×3 – 72" long
- center horizontal 1×4 – 31" long
- 1 center vertical 1×3 – 29.5" long
- 2 lower verticals 1×2 – 29.5" long
- center vertical 1×2 – 31" long
- 4 short angled cedar strips to fit
- a few cedar strips to back of door to cover staples
Hardware:
- Screen door spring hinges
- Door pull
- Hook and Eye latch
Other supplies:
- Fusion Mineral Paint Stain and Finishing Oil (Mixed Golden Pine & Cappuccino)
- Chip brush
- Pet screen
- High grit sandpaper
- Rags
How to build a screen door
-
Measure the open doorway.
-
Cut lumber to create a rectangle frame just under the doorway measurements. Be sure measurements clear your doormat.
-
If using a Kreg Jig, drill pocket holes into the 2 side boards.
-
Attach side boards to top and bottom boards using pocket hole screws.
-
Prop frame up against your front door to decide where you wish for added elements and supports that will compliment your front door.
-
Add a center horizontal board in the middle of the door frame for support. Drill pocket holes into this piece and attach to frame.
-
Attach a heavier center support to the lower half of the door.
-
Insert additional vertical supports to the lower half of the door for looks and durability.
How to stain the door
-
Lightly sand the frame.
-
Stain all the wood with 2 coats for added durability.
How to install screen
-
Lay the screen door front-side-down.
-
Cut 1 piece of screen slightly larger than the entire door frame opening.
-
Staple screen into place with an electric staple gun.
-
Cut cedar strips to fit over top of the staples to hide them. Screw them into place once stained.
How to install a screen door
-
Decide where the door hinges will be placed. I added a 1×2 to one side of the doorway for this to work on mine.
-
Attach the hinges to the door and 1×2.
-
Add remaining hardware such as door pull or anything else desired.
-
Install 4 corner supports on an angle out of cedar strips to keep door squared-up.
View the complete tutorial at FUNKY JUNK INTERIORS HERE
.
Other outdoor projects to make:
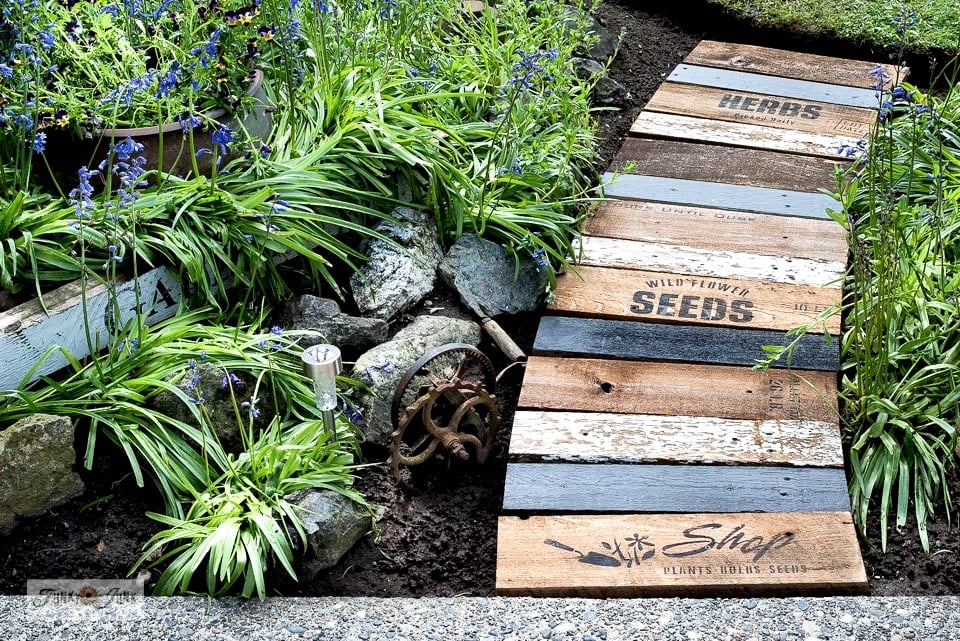
How to make a garden-themed scrap wood walkway
Learn how to replace window screens
How I added screen doors to french doors – easily!
Visit many more outdoor projects HERE
View Comments (35)
Very Nice!
I was just thinking .... I need a screen door for my Back door...
now I know what to do-Thanks!
I got my screen door for my Front door from the local dump!
Was in perfect shape so I brought it home, spray painted it and put on some new door pulls-fit Perfectly -looks great.
Went to the Hardware store shortly after, and there was my screen door-
same door selling for over $100!
Amazing what people throw away.
Thank-you! And what a find! Which is always the ultimate of course!
But it's sure nice to know I can make one anytime now... beyond thrilled!
Love the screen door, it looks great!
Thanks Terri! I keep running back down to it amazed that it exsists... haha
You amaze me! Your abilities to create astound me! We Southerners (Texas) love a good screen door!
I am seriously impressed. WoW! You make the build sound so easy.Great tutorial and great tips. I hate our screen door, and love yours, so maybe...but first. I have to get our front door painted :)
Thanks Kim! The concept is actually simple. It's just learning how to do all the steps to make it fit right is tricky! Then again, I'm not a pro door maker...
I was on this for a few days... and even did a few steps twice. With long breaks in between. LOL
I'd hope my next round would place the level of difficulty in the Medium category at this point!
Gorgeous job! I love it!
Your screen door is AWESOME! I love the addition of the license plate - it looks kinda like a push plate. Remember on old country grocery store doors they used to have Coke or 7Up or name brand bread advertisements on the pushplates? Those vintage push plates go for big money in antique stores and your's looks so much better! You're going to love the pet screen. We bit the bullet and replaced our old window screens with pet screen because a four legged member of our family (Zoey the dog) liked to push her nose up against the screen when looking outside. It has held up well for the last couple years to "dog nose" and I think the black screen even looks better than regular screen.
Thanks Sharon! And yes, my initial idea had been to create a faux push plate with some soda pop advertising. It didn't work out as imagined for this door, so I'm going to save that look for my french doors in the kitchen!
Good to hear the pet screen works well! I'm thrilled! My cats love to climb the stuff...
And I agree. The black screen is GORGEOUS and does not hide the view at all!
Very impressive building skills, Donna! Your rustic screen door looks so good with your freshly painted door color. Don't you just love your new tool? I haven't met a Kreg jig I didn't love yet. LOL
Donna -- have always wanted this type screen door for both front and back doors. Hate what i have now. Plus 3 cats! Wondered how that pet screen worked. I have several windows the cats have made holes in.
I have the jig but have never used it. Have a circular saw but am a little afraid of it! LOL Must make this door this summer.
Hey Carla, I myself much prefer a miter saw over circular! If you don't have one yet, I highly recommend it. It's much safer to work a blade that is staying put than to carry it around imo!
I love your screen door and instructions. You can buy the pet screen in different colors at Fabricville, and I've seen it at Canadian Tire. I've used pet screen to make roomy beach bags.
Thank-you Lyndell! And that's so cool to know, thanks!
This is great! I'm going to be looking for a new screen door very soon. Now, I'm really glad I came across this link. Thank you so much for this!
Yay! I hope you go for it Jayne, the outcome is so unique and cool!
Donna, I was looking for an after picture of the inside of the door and didn't see it. The reason being is I was curious if you cut that excess screen off that was hanging past the cedar strips? Great choice of color, did you just experiment or how did you come up with doing that? Thanks.
Hey Nick, that's a good question and something I thought I covered in the post! I just edited it to read:
12. Trim screen excess, or leave extra in case you desire to re-tighten the screen in the future.
I left extra just in case, as shown above.
Thank you.