If you love the look of pallet Christmas trees, this charming and unique stenciled wooden Christmas tree sign with lights will be right up your alley! A wooden Christmas tree farm… how fun!
Three things go hand-in-hand in my neck of the woods when Christmas rolls around…
Wood trees, scrap wood, and a unique new collection of Christmas stencils to create new projects with!
So today this tutorial combines all three, ending up with a very unique and easy way to create a wood Christmas tree sign, perfect for DIY holiday decor creativity with a rustic touch!
View Woodenville Trees stencil HERE
Wooden Christmas tree stencil
Woodenville Trees is a Christmas tree farm stencil that showcases 3 pallet Christmas trees, complete with pallet tree skirts.
This unique wooden tree Christmas sign stencil just had such a neat rustic vibe to it, and I couldn’t wait to create a whimsical wooden Christmas sign frame and backdrop to match! With a fun twist that adds a dash of sparkle…
So if you too would love a unique Christmas sign, perhaps this pallet Christmas tree farm will be right up your alley!
Here’s what I did:
This post contains some affiliate links in which I earn a small percentage from qualifying purchases through these links, at no extra cost to you. Thank-you for helping to support my blog!
Stenciled wooden Christmas tree sign with lights
Supplies I used:
Woodenville Trees Christmas tree farm stencil from HERE
Metallic Pearl by Fusion Mineral Paint
Almond Latte by Milk Paint by Fusion
Old window frame without glass
Cedar strips to fit window opening
Copper or gold small ornaments
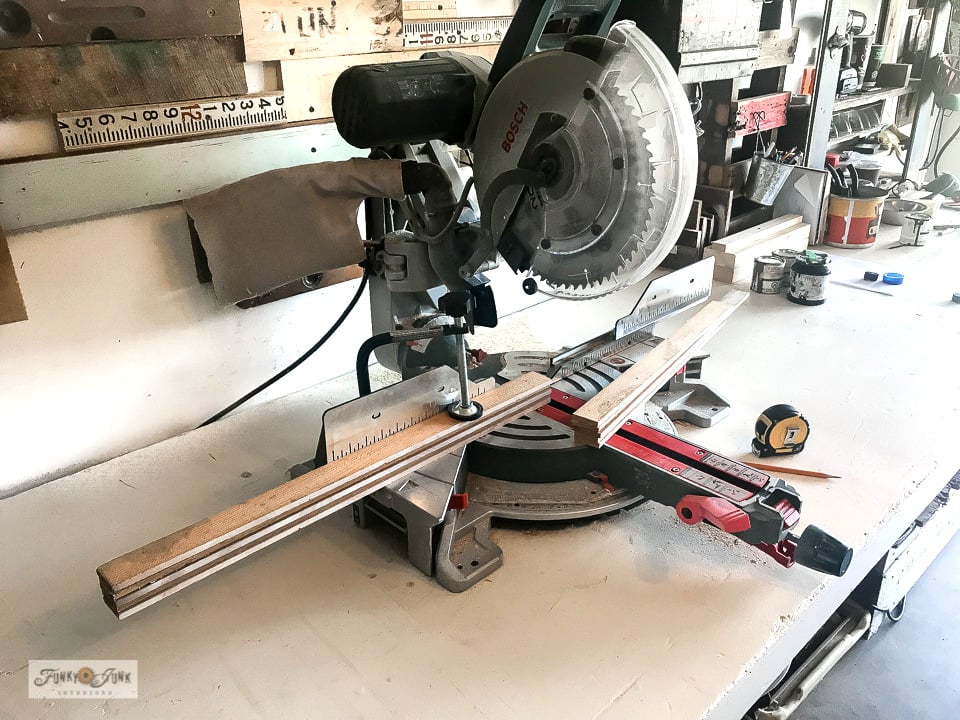
Measuring the cedar strips
1. Line up cedar strips, then place an old window on top to determine how many cedar strips will be needed to fill it in.
Cutting the cedar strips to size
2. Using a miter saw, cut the cedar strips to fit the window opening.
Painting the cedar strips
3. Use a wider paint brush to paint the cedar strips with Fusion Mineral Paint’s Ash, which is a deep grey colour.
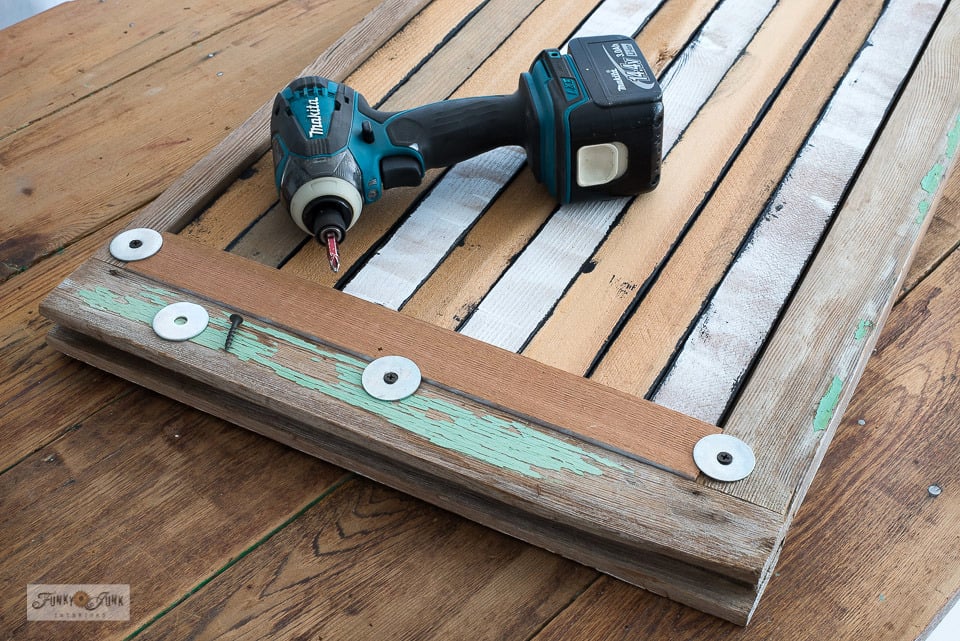
Installing the cedar strips to the window frame
4. Flip the window with good-side-down, then position the painted cedar strips inside the opening, painted side facing down.
5. To hold the cedar strips in place, cut two side support boards to fit the height of the window, then attach them to the left and right of the window held in place with large washers and screws as shown above.
It’s funky, but it works!
Now you’re left with a nice rustic sign base wearing a mini pallet-look, nestled inside an awesome rustic window frame. The perfect backdrop for this style of wooden Christmas tree sign!
So let’s stencil it up next!
Almond Latte Milk Paint by Fusion
Stenciling the sign
6. Choose a pallet-toned paint which will contrast well with the deep background colour.
Milk Paint by Fusion’s Almond Latte is a wonderful mid-tone shade of wood, which I felt would be perfect for the look I had in mind!
How to mix Milk Paint
A very small amount of Almond Latte Milk Paint by Fusion with water. You won’t need much to stencil with, however you may wish to mix it a little thicker for stenciling purposes.
- Mix a little more milk paint powder with a little less water into a cup.
- Stir well, then allow to sit for a few minutes to give the powder time to fully dissolve and thicken up.
- Give the paint a stir right before and during stenciling to keep it well mixed while being used.
New to Milk Paint? Read these helpful tips!
All About Milk Paint – how to use and what to get
Start with THIS Milk Paint starter kit which includes everything you need!
View Woodenville Trees stencil HERE
All paint used
Stars: Metallic Pearl by Fusion Mineral Paint
Trees: Almond Latte Milk Paint by Fusion
Backdrop: Ash by Fusion Mineral Paint
Shop online HERE and get 10% off all Fusion products!
How to stencil a row of wood Christmas trees
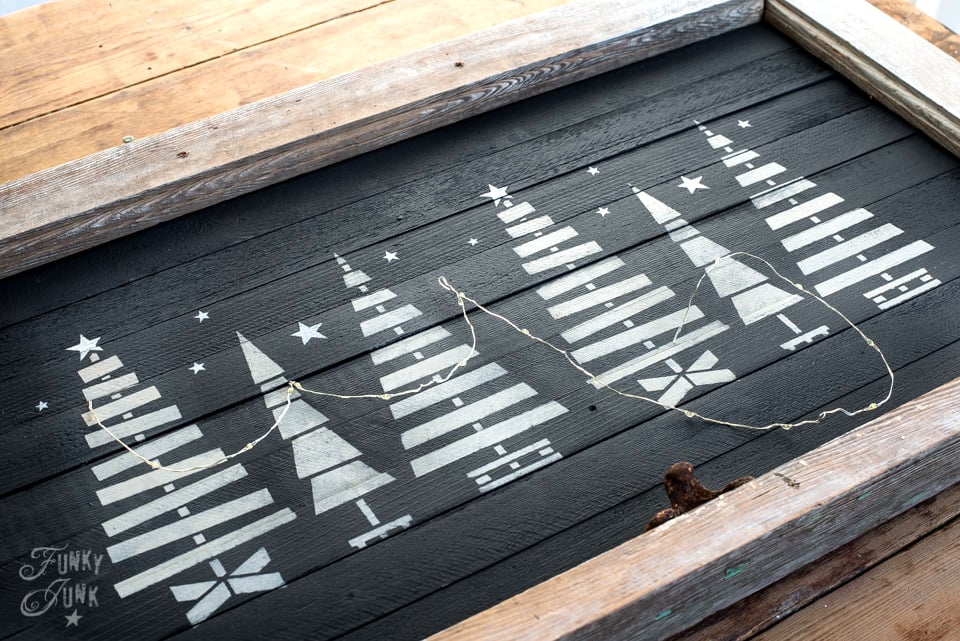
7. Stencil a full row of wooden Christmas trees across your sign by repeating the same stencil side-by-side.
Since I desired to fill this entire sign with tree images, I used the stencil twice. All three trees are slightly different in style and height, designed to look great if the stencil was repeated.
The trees were stenciled in Almond Latte, and the stars in Metallic Pearl.
- Determine the middle of your sign.
- Position the stencil on the left where you’d like to start.
- Dip stencil brush into Almond Latte, then remove most paint until brush feels dry.
- Tap or swirl brush through the tree images for the desired effect.
- Stencil the stars in Metallic Pearl so they pop.
- Re-position the stencil to the right, then repeat stenciling.
Learn more tips on how to stencil from THIS POST: Everything you’ve ever wanted to know about stenciling
Cute look, isn’t it?! Now let’s add a little extra holiday magic with some additional sparkle that suits as pallet Christmas tree farm!
Hanging the lights on the trees
Nearly every holiday movie showcases shopping for a Christmas tree at night under lights. So let’s create that feeling with this sign with fairy string lights! The perfect festive decoration for smaller wooden Christmas tree crafts.
8. Determine how much lighting will be needed for the front of the sign, and determine a good starting point.
9. Flip the sign facing down, then thread the lights through the starting point between the wood slats, or through a drilled hole.
If your sign isn’t made of wood slats, you’ll need to come up with a clever way to attach the wires to each tree. Hot glue, staples, pins, tacks or small nails could all work.
10. Flip the window sign facing up, then swag the lights between each tree landing at random levels on each one.
11. To attach the wire to a tree, pinch the wire where it lands on the next tree, then slip the pinched part through the wood slats, careful to not include a light between the wood. Reposition the wood slats so the wire stays put.
12. Repeat on all the trees until done!
13. End the lights by simply hanging it ending at the perfect spot, or thread them through the back of the sign.
And that’s about it! Your pallet Christmas tree farm sign is now ready to decorate!
I love how the rustic wood frame of the window marries the pallet wood theme! And with a little added faux snow and a few shiny copper ornaments, this look is now complete!
Different ways to stage this Christmas tree sign:
- Place on a shelf
- Hang on a wall
- Add hooks for coats, blankets or towels
- Center it on a Christmas fireplace mantel
Aren’t the fairy lights the perfect touch? Just enough to add a small bit of sparkle against the dark backdrop.
Video
[adthrive-in-post-video-player video-id=”xYa9UHMR” upload-date=”2023-01-20T03:18:18.000Z” name=”DIY pallet Christmas tree sign with lights!” description=”If you love the look of pallet Christmas trees, this charming and unique stenciled wooden Christmas tree sign with lights will be right up your alley!” player-type=”default” override-embed=”default”]
.
Visit above to watch a short video on the stencil and lights process!
This is such a fun and unique way to create a Christmas sign, don’t you think? How would you stage yours?
View Woodenville Trees stencil HERE
Check out many other unique Christmas stencils HERE
Stenciled wooden Christmas tree sign with lights
If you love the look of pallet Christmas trees, this charming and unique stenciled wooden Christmas tree sign with lights will be right up your alley!
- Miter saw
- Cordless drill
- Orbital sander
- Woodenville Trees stencil
- Ash Fusion Mineral Paint
- Metallic Pearl Fusion Mineral Paint
- Almond Latte Milk Paint by Fusion
- old window frame without glass
- cedar strips to fit inside window
- dome tip stencil brush
- fairy lights
- faux snow
- copper ornaments
-
Cut cedar strips to fit inside window frame.
-
Paint the cedar strips in Ash.
-
Flip window good-side-down, then position painted cedar strips inside window frame, painted-side-down.
-
Brace the strips with two side support strips, held in place with wide washers and screws.
-
Stencil the trees stencil twice, using Almond Latte for trees, and Metallic Pearl for stars.
-
Add fairy lights by stringing them through the back of the sign between the wood slats or drill a small hole.
-
Swag the lights from tree to tree by pinching the wire, and pushing it through the slats or attach in another way.
-
Decorate with copper ornaments and faux snow to get this look!
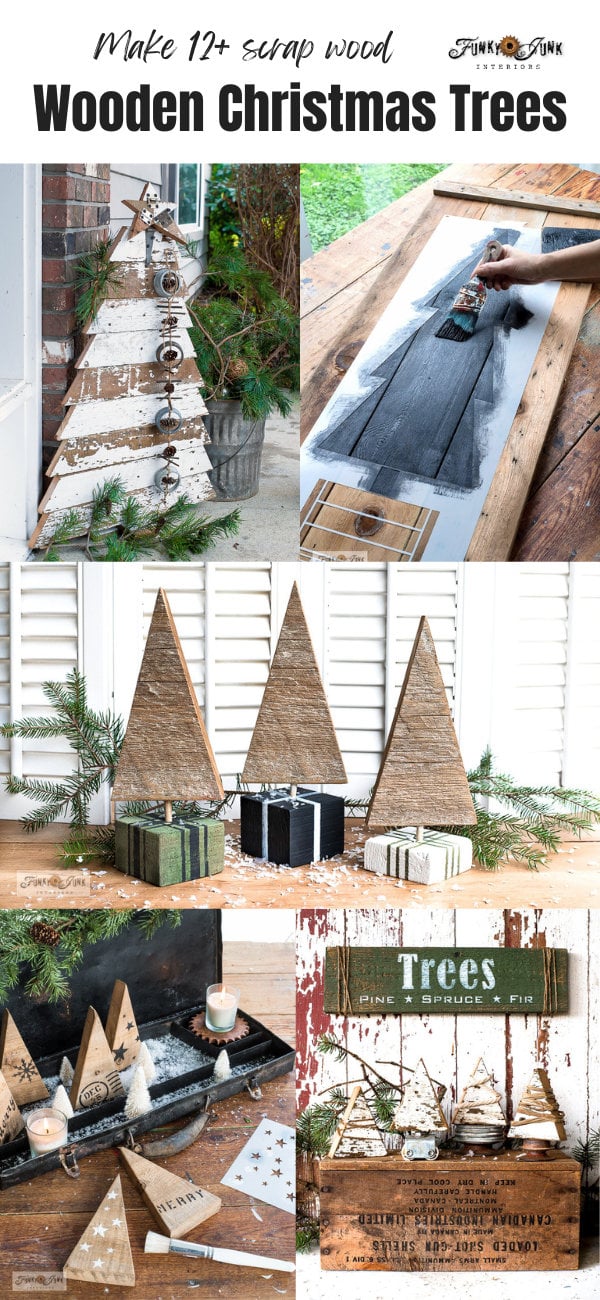
Other wooden Christmas tree ideas:
12+ Wooden Christmas Tree ideas to make in one post
Visit all DIY Christmas trees HERE
View all my Christmas projects from one page HERE
View Comments (3)
so creative and beautiful. as always!
I love this and pinned it! It is so doable. Your instructions are easy and understandable. Think you missed your calling as a teacher. The design of the trees that look like miniature pallet trees is adorable. I notice I am drawn to smalls and creating vignettes. There's a lot of time that goes into your stencil designs. I appreciate that. I love this design and post.
I LOVE this stenciled wooden Christmas tree sign with lights! You're so creative and inspiring!